


Best viewed using:
Internet Explorer
or
Mozilla Firefox


Application notes for the N8101 & N8101B DC Power Source
in a DCC environment
DCC track power ("a stream of digital transitions between two equal voltage levels that have opposite polarity") Translation: "digitized AC". We'll consider it acting like AC voltage for our purposes here.
Discussion here is limited to an input voltage maximum of 16-volts because that is the design limit of our N8101. For model railroading this includes typical (rectified DCC) track voltages for Z, N, and some HO scales. Our N8101B can handle a maximum of 25-volts DC so it can support All HO & DC S & O Scales, and depending on maximum track voltage, some G Scale operations.
The advantages of DCC for model railroad operation over straight DC (analog) operation are well documented and too numerous to mention here. One advantage is the ability for full power to be available at the tracks even when rolling stock (including locomotives) is just sitting quietly on the tracks. Without going into much detail, the DCC signal on your track looks like AC. This is because like AC, with respect to "ground" (zero voltage reference point), this signal also goes negative (minus volts). This is one of the reasons DCC will allow you to run different locomotives in opposite directions on the same section of track, at the same time. Truly marvelous, but a problem for devices that require polarity-constant DC voltage, such as our LEDs and lighting special effects Simulators. Fortunately, there are two solutions to this problem and both are inexpensive:
Discrete components
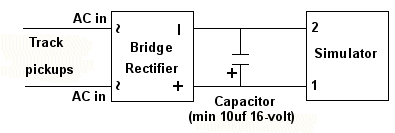
Since DCC track power "looks" like AC to a polarity sensitive DC device, it must be routed through a full-wave (bridge) rectifier. This bridge converts the voltage to +DC always on the bridge's + pin and –DC (ground) always on the bridge's – pin. Either of our bridge rectifiers (our N301S or N302S) will work just fine. In addition, a filter capacitor (10μf or larger and minimum 16-volt) will be required. This is used to smooth out the "bumps" in the converted DC voltage. Figure 1 below is schematic diagram of the connections required and shows the bridge connected to one of our Simulators..
Figure 1
This is the least expensive solution, but is has a couple of minor drawbacks. First, the bridge rectifier and capacitor are not mounted on a circuit board so direct solder connection is required and you will need to ensure the pins on the rectifier and leads on the capacitor (depending on the type of capacitor) are organized so that they won't short out against anything. Second, depending on the physical size of the bridge and capacitor selected, and the scale you're modeling, hiding these additional components so they're not noticeable can be a bit of a challenge (visualize a FRED and a flatcar).
N8101 DC Power Source
A more elegant, but very slightly more costly ($3.95 to $4.45) solution would be to use our N8101 or N8101B DC Power Source. It has all of the components needed, includes a circuit board with solder points, is extremely tiny (1/2 the size of our Simulator), it also has an additional solder point for direct connection of an LED plus solder pads on the back of the board for the LED's current protection/brightness control resistor.
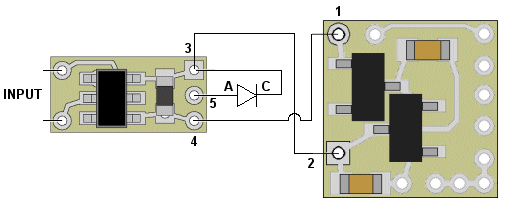
Shown in Figure 2 below, is an example of the N8101 wired to a Simulator and using the optional LED connection (solder point 5). Note the LED's anode connection to 5 and its cathode connection to 3 on the N8101. This LED could actually be a series group if the rectified input voltage is sufficient to support multiple LEDs). Again, the resistor soldered to the solder pads on the back of the N8101 should be chosen for protection of the LED (or series group) at expected rectified voltage. An easy way to determine this voltage is to temporarily connect an N8101's input solder points to your DCC track and measure the DC voltage present at the N8101's output solder points 3 and 4. This reading is the voltage to use for your calculation.
Figure 2
In the example above, we could add additional Simulators by connecting their inputs to solder points 3 and 4 of the N8101, just as the one above. Or, we could add additional LEDs (or series groups) by connected them to solder points 3 and 4 (not to 3 and 5). These additional LEDs will need their own resistors wired in series with them.
The limiting factor for the number of devices (Simulators and/or LEDs) connected to an N8101 or N8101B's output pins 3 and 4 is that the total current usage for all devices added together must not exceed 200ma.
Flicker control
The short answer is: Special effects lighting typically doesn't require as much flicker protection as "always-on lighting, and is some cases may not require any.
A more in-depth explanation follows:
When including devices that produce special lighting effects, such as our Simulators, the term "flicker" really needs to be defined a bit more accurately. In a typical model railroading environment, "flicker" is the result of momentary power loss to rolling stock lighting such as passenger car interior lights, caboose marker lights, or locomotive lighting. These are normally lights that are on all of the time. When dirty track, wheel sets, or track gaps cause temporary power loss, the flicker that occurs is quite noticeable. This is a classical case of flicker. Controlling this pesky problem is performed by adding a capacitor or capacitors to the circuit which "charge up" under normal track power, and drain into the circuit to keep the lights on during momentary power losses. Depending on the type and number of lights (and track voltage level) the amount of capacitance required to eliminate the flicker problem (either totally, or mostly) can be up to as high as 1000μf for circuits with multiple lights. Capacitor requirements for good flicker control for most single-light circuits, typically ranges from 300μf to 600μf. Again, this value totally depends on how much current the light or lights draw and how long the period of time is that the capacitor(s) must provide power.
With special effects lighting, when power is interrupted, a Simulator's microcontroller is reset causing the effect to restart. Depending on the particular effect, this reset may or may not appear very obvious, and as a result may or may not be objectionable to the observer. When a Simulator is powered through one of our N8101 or N8101B DC Power Source modules, the tiny 10μf capacitor on-board is not large enough to keep a microcontroller from resetting. This capacitor is primarily for filtering of DCC and AC rectified input voltage. The addition of external capacitor(s) would (might) be required.
Now, unlike the very obvious flicker with always-on lighting, two things are quite different with effects lighting. First, with very few exceptions (ditchlights and steam-era class lights come to mind), the special effect either varies lighting intensity (i.e. marslights and gyralights), turns lights on and off (FREDs, flashers and strobes), or some combination of both (beacons, alternating flashers, etc.). Second, very little power is required to keep a Simulator's microcontroller alive (about 1/2ma at 2.1-2.2 volts). The simulator's on-board regulator draws a little power, but it is minimal. When power is momentarily lost, if the associated lighting for the effect is on, that light source will be responsible for nearly all of the power drain in the circuit. One 2-volt 20ma LED draws 40 times as much power as the microcontroller. A 3.3-3-6 volt LED will draw 60 times as much. If the effect is in the off mode, only the microcontroller is drawing power. So... how much external capacitance is needed with special effects lighting? It...depends.., but, for the most part, not nearly as much as always-on lighting.
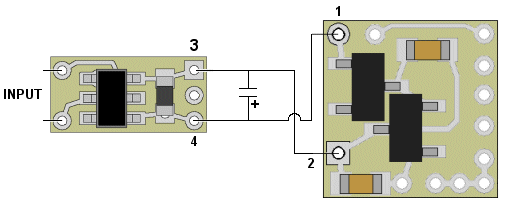
The old saying: "beauty is in the eyes of the beholder", really comes into play here. The "it...depends" really depends on the type of effect and how it "appears" when power is momentarily interrupted. Figure 3, below shows where additional capacitance would be added to a typical lighting special effects circuit.
Figure 3
The capacitor or capacitors are connected across the DC output (Simulator input) as shown. If multiple capacitors are used (i.e. our small 100μf N3100 or 68μf N3068 capacitors), they must be wired in parallel with each other (all of the + connections jumpered together, and all of the – connections jumpered together).
Rating the "need" for capacitance
Below is a what we would call a starting point for the determination of adding capacitance to a lighting effects circuit. We've rated the "need" from least to most based on what is likely to have visual impact on the realism of the effect. While this is our opinion, it should only be treated as a guideline, because beauty really is "in the eyes of the beholder". What is truly important, is how the effect appears to you.
Least
FREDs and Strobes (none to possibly 200μf)
Beacons and alternating effects (100μf to 300μf)
Marslights, Gyralights, etc. (200μf to 500μf)
Ditchlights, steam classlights, etc. (300μf to 800μf)
Passenger car, MOW, cabooses w/interior lights & marker lamps, etc. (600μf to 1200μf)
Most
"Always on" lighting
The N8101 is well suited to provide constant-polarity DC power for general lighting of model railroad rolling stock. This would include passenger car and caboose interior lighting, marker lights in general and locomotive cab, class, and number board lights. Its low-loss schottky bridge rectifier and multi-layer filter capacitor will provide clean DC to polarity sensitive devices like our LEDs. Having a current carrying capacity of 200ma, the N8101 is powerful enough to support any typical rolling stock lighting requirement with room to spare. As noted above, the on-board 10μf filter capacitor is not intended to provide any meaningful flicker control. External capacitor(s) are required for that purpose. The diagram in Figure 3 covers the connection of capacitors to the N8101's output solder points.
When wiring passenger cars for interior lighting (in most cases, multiple LEDs), we always recommend wiring the LEDs in parallel with each having a protection resistor selected based on rectified track voltage. If you need to review parallel LED wiring, more information is available here.
Other power needs
While the vast majority of track powered applications for rolling stock (other than motors in locomotives) is lighting, there are certainly other cases where polarity sensitive devices might need power. Since the N8101 can handle up to 350mW of power, this could include tiny motors, solenoids or other DC actuators, or miniature circuitry to perform various functions. The N8101's tiny size will allow it to be place just about anywhere.
© 2008 Ngineering