Best viewed using:
Internet Explorer
or
Mozilla Firefox


Making a tree
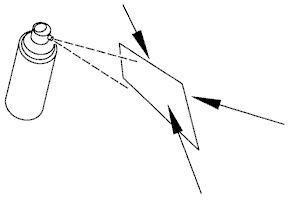
- Select a fret and spray on a coat of gray primer. Be sure to spray at various angles so all of the edges of the trunks, limbs and branches are covered (see Figure 1). Avoid spraying on too much paint. Keep the spray can at sufficient distance to cover evenly and thoroughly, but not a heavy coat. Allow the primed fret to dry thoroughly (overnight is good).
Figure 1
Figure 2
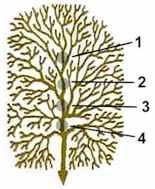
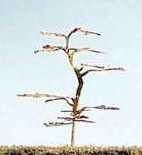
- Once the selected trees are cut from the fret, pick one to begin the first forming step in a three-step shaping process. Here, we'll use two pair of needle-nose pliers. One to support, and the other to gently twist the central trunk in specific places. Look carefully at Figure 3 and note the general shape of the tree trunk. This particular tree has a fairly straight trunk with large limbs branching off at various points. The areas that we will be bending (twisting) are marked with gray balloons as 1, 2, 3 and 4. We'll work from the top, downward. The objective is to create a slight twist in the trunk that is between the branches above, and the branches below, (the ballooned area). This will begin giving the tree its basic 3-dimensional shape. Using one pair of pliers, grasp the tree just above balloon 1 where the trunk forks into branches. Hold the tree with the other pliers just below the balloon 1 area where the trunk joins the branches below. Carefully twist the upper portion of the tree (120 degrees or so). Now grasp just above and below balloon number 2, and once again, rotate the pliers to twist the trunk in that area. By working down the tree gradually in this manner, it should begin to take shape as shown in Figure 4 to the right. Look at the tree from the top to be sure you've rotated sections so there is some portion in every quadrant (not one side that's empty).
- Using your side cutters and tiny scissors, start cutting trees from the fret. It's best to start at one end and work across. Cut the smallest branches first, and end with the base of the trunk. When cutting the base of the tree trunk from the fret, we recommend cutting it to a "V" shape at the bottom. This will help when mounting the trees in cut pieces of the bamboo skewers which will be used as holding and mounting fixtures later on. The "V" cut should look something like Figure 2.
© 2008 Ngineering
Figure 6
Figure 5
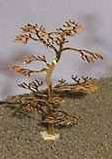
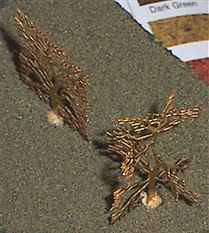
- Next, we'll start twisting the main limbs from their vertical position to a more horizontal arrangement. Start with the lower branches and work progres-sively up the tree. Remember to grasp each limb so when the twist is made, it occurs along the branch. This will prevent making any very sharp kinks. Since in many cases we will be re-bending and "tweaking" the brass tree several times to achieve our final shape, if we make a sharp kink and rebend that spot, there is a chance we could break a branch. A little care in this regard will prevent that from ever happening. As we perform this step we don't need to bend every branch perfectly (see Figs. 5 and 6). Remember, we're simulating nature here so a somewhat random appearance is what we really want.
Figure 4
Figure 3