Best viewed using:
Internet Explorer
or
Mozilla Firefox


- Select a tree that has been formed as detailed in step 5 and affixed to a skewer (step 8). Begin applying the caulk to the upper trunk, working down toward the base. Do not apply to much to start as you can always add more to get the appearance you want. Select the larger limbs that branch off the main trunk and apply caulk to those as well. Use a pointed toothpick or pin to push the caulk around so the branches and trunk are "blended" together as they would be on a real tree. If you get a few small bubbles, pop them, but tiny lumps and bumps can actually give the appearance of knots and cut limbs that are on real trees. In other words, don't attempt to make everything perfectly smooth. Be sure to work around the tree so that all sides of the larger branches and trunk have enough caulk applied. Remember to have less caulk as you go up the trunk, or out a branch (tapered like the real thing). If you goof a little, just dab it away and continue. As you work down the trunk, apply enough caulk so that it flows down and out on the top of the skewer. This will form the bowl of the trunk. Even a little extra here will help in the appearance of above-ground root growth. A small medium-bristle brush can be used to create bark-like texture on the larger and base portion of the trunk by gently dragging the bristle tips down the caulk. Once you've applied the caulk to your satisfaction, set the tree in the skewer holder, and go to the next one. Figure 12 at the right is a good example of working the caulk around and tapering for good appearance. Allow the caulking to dry overnight.
-
Once a caulked tree has dried, it is ready to proceed in one of three possible directions:
-
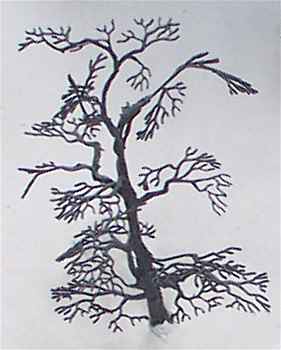
It is to be completed as a bare (or dead) tree.
-
It will have ground foam foliage applied.
-
It will have etched foliage applied.
- To apply static grass to a caulked tree, make sure you're in a well ventilated area. Get your shaker of static grass and plastic dish (to catch the grass fibers that don't stick to the tree), and hairspray. Select a tree and while holding it by the skewer, rotate the tree and spray it with enough hairspray to moisten the tree branches. It's a good idea not to spray directly into the center of the tree, but rather along the side while rotating. That way the ends of the branches will be moistened, but not as much will spray on the central trunk. While the tree is still wet with hairspray, lightly sprinkle some static grass along the tree limb ends while rotating the tree. What you want to achieve is to get a little of the static grass on the outer branches because this is where the small twigs grow. Remember to go lightly. If you don't get enough on, just re-spray and sprinkle on some more. Once you've achieved the effect you want, wait about 5 minutes for the hair spray to completely dry and the lightly spray the entire tree with primer. This will permanently affix the static grass.
Our mighty Oak in Figure 13 at the right is a good example of the use of static grass. This tree was created from one of our 35-foot (NS041) tree frames. What was wanted, was a tree in late autumn that had already lost a good portion of its leaves and left a lot of little branches showing through. This was achieved adding a very light flocking of ground foam with a brown (dead leaf) color.