


Best viewed using:
Internet Explorer
or
Mozilla Firefox


Working with Photo-etched products
In general, working with our photo-etched products requires many of the same basic steps that would be required when working with most small, delicate parts.
-
Ensure that your working area is uncluttered and clean.
-
Use adequate lighting.
-
Good magnification will assist in accuracy of cutting, bending, bonding and painting. It will also minimize eye strain.
-
Ensure your hands and tools are clean and free of oils.
Now, to specifics. Following are five sections:
-
Basic tools
-
Advanced tooling and aids
-
Cutting, bending and forming
-
Bonding (glues and adhesives)
-
Painting
Basic Tools
Following is a list of what we consider to be the essential tools needed to work with photo-etched products. Most modelers and hobbyists will already have these on hand.
-
High-quality pointed tweezers (stainless steel). Two or three pair.
-
Small (sharp) pointed scissors. Fiskars No. 4 Mini Craft Scissors is a good choice.
-
Fine-pointed scriber (a carbide tipped scribe is OK as long as it's sharp).
-
Hard, flat, cleanable working surface. A piece of 1/4" plate glass is an excellent (and inexpensive) choice. More on this under Advanced tooling.
-
Good quality magnifier(s). We have found that the head-band type magnifiers such as those manufactured by Optivisor, are an excellent choice. They provide good depth-of-field and stereo vision, have a long focal length (distance to work object) and are quite comfortable.
-
Safety glasses (for when you're not using your magnifiers).
-
2" metal machinist's square.
-
Scalpel or X-acto knife with a supply of good quality #11 blades.
-
Side cutters (diagonal cutters) Xuron Corp. track cutters also work well.
-
Small pliers (needle-nosed)..
-
Flat-tipped or right-angle smooth-jawed bending pliers. Sears and most hardware stores carry a variety.
-
Single-edged razor blades.
-
Small spring-loaded hair clips. Not really essential, but very handy for holding parts while adhesive dries.
-
Pointed toothpicks.
Advanced Tooling and Aids
In addition to the tools noted above, we'd like to mention a few items we feel are very useful either because they provide superior performance or simplify a procedure or task.
-
Jeweler's Bib. Very helpful when working with any small parts or tools. We recently added it to our Tips 'n Tricks page, and a direct link is here.
-
Advanced bending fixture. A company called The Small Shop has developed, and is marketing a very nice, and easy to use bending fixture they've named "The Hold and Fold PE Workstation". They have several sizes available. This tool is particularly useful for precise bending of the larger etched pieces found in structure kits like those manufactured as Micro Structures by Miller Engineering.
-
Light box. For precise cutting of the tiniest etched parts, back-illumination can be very helpful. We credit Scale Link Ltd., of England, with this suggestion, and after trying it, we couldn't agree more. We've detailed how to make one on our Tips 'n Tricks page. Click here for a direct link. And, with the light off, the hard, flat plate glass surface is excellent for general assembly work.
-
Airbrush. Certainly not essential for working with photo-etched material, but provides a more even control of paint applied. For example, when working with our photo-etched Foliage products, an entire fret can be sprayed prior to removing any parts. Then only light touch-up is required at the cut edged later on. A huge timesaver. More on painting below.
Study any instructions before you start, they are there to provide assistance. Study the fret itself and think through your assembly procedures. The brass frets are, of course, much softer and easier to cut and bend than the stainless steel frets. As a result, the brass parts are also much easier to damage. Take your time, make sure you're comfortable and your arms and hands are well supported. You'll find that etched parts are just as easy to work with as parts in plastic or wood kits.
When cutting parts from a fret, always cut the thinnest connecting point first, and continue progressively so the thickest section is cut last. This helps minimize distortion of the part being removed. Etched parts can have sharp edges so handle them and their fret with this in mind.
If you will be removing two or more parts from a fret, it's a good idea to have a shallow container to put the in temporarily, as they're removed. A glass Petri-dish is a good choice and they are available with covers.
Bending and forming thin etched parts requires care and clean tools. Many parts may have an etched groove along the part intended to aid in the bending process. In this case, always bend the part into the groove, not away from it. (see Figure 1).
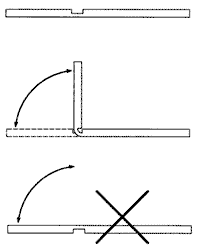
Figure 1
Bonding
Nearly any adhesive will work with etched materials, but what you're building, is likely to determine the choice. The all-around most popular choice is CA (Cyanoacrylate). That's because it's fairly strong and very quick setting. You only need to hold parts in position for a few seconds to get a bond. This make assembly much quicker.
5-minute epoxy is also a good choice as it will give a much stronger bond, but requires a holding fixture or clamping during the curing process.
Soldering has been used on brass, copper and phosphor bronze etched materials for years. It provides a very permanent joint, but the process requires cleaning and can cause distortion. Soldering is normally reserved for larger parts.
For very small parts that will ultimately be painted, here's a neat trick we learned from Scale Link, Ltd., of England; Let the paint itself be the adhesive. After the paint dries there will essentially be no (possibly ugly) glue joint and the part will be held firmly in place. Clever.
Painting
Since etched parts themselves are metal, any type of paint is acceptable. However, since various types of adhesives may be used and the etched parts will likely be bonded to different materials, these things will ultimately determine what is appropriate. The "least offensive" are the acrylics and latex paints because they are water based and don't contain some of the solvents that aggressively attack materials. Spraying (whether spray can or airbrush) produces the smoothest results, while brushing is most appropriate for small parts. The most important considerations are clean (oil-free) parts, good ventilation, and patience.
When you form an etched part, remember that the material they're made from, (brass, stainless steel, phosphor bronze, or whatever), is of high purity and not dead-soft. There will be "spring-back" requiring you to over-bend to achieve the shape you want. This applies to angled bends, curves, and other complex shapes. As you work with etched parts you will develop a "feel" for how they behave when being formed. The important thing to remember is, have a gentle touch and patience. Try to minimize the amount of rebending you do to achieve the shape you want. If you bend a part in exactly the same place repeatedly (especially bending and reverse bending) a process called "work-hardening" occurs. Work-hardening is an effect that happens at the molecular level during bending that increases hardness of the material toward being brittle. This is because as you bend, one side of the material is being stretched, while the other is being compressed. This process damages the molecular uniformity (or grain) of the material causing it to breakdown. When we score and snap styrene, we're using work hardening to our advantage.