


Best viewed using:
Internet Explorer
or
Mozilla Firefox


As with the other foliage, the entire fret should be primer painted and thoroughly dry prior to any other painting. Also, as with the Ivy/Grape above, we recommend painting the fret a with a "two-tone" (lighter and darker shade) scheme. You should spray the "back" side of the fret a slightly lighter (but noticeable) shade and spray perpendicular to the surface, not at an angle. After drying, spray the fret "front" a slightly darker shade. Make sure to spray at a slight angle to get the edges also. Not too much of an angle or you'll get overspray and the back of the leaves also.
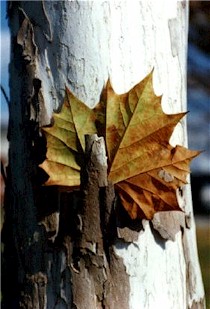
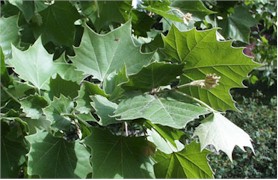
The colors you choose really depend on the tree you will be modeling and the season in which it will be represented. For example, Figures 3 shows a Sycamore leaf during full growing season, and Figure 4 show the autumn color.
Color changes will also be dramatic with the Maple and Oak. Not so much with the Willow, it tends to go towards the yellow in fall from a much lighter green in spring and summer.
If you look closely at the fret, you'll notice that one side is "relief etched" with more detail. You can actually see the veins in the individual leaves, and the raised stems. The other side is a flat surface. For the purpose of discussing painting, we'll refer to the side with the veining as the front. To achieve the greatest detail, we recommend using two shades of green when painting this foliage. In real life, if you look at leaves on most plants, you'll find the top surface (the side that faces the sun) to be a darker color than the underside.
We suggest you spray "back" side of the fret a slightly lighter (but noticeable) shade of green. Spray perpendicular to the surface, not at an angle. After drying, spray the fret "front" a slightly darker green. Make sure to spray at a slight angle to get the edges also. Not too much of an angle or you'll get overspray and the back of the leaves also. Now, to add some dazzling realism, using some of your lighter shade of the green, lightly dry brush the surface of the front side to highlight the veins and stems. The appearance is absolutely spectacular.
Carefully, cut the painted runners from the fret. Now you can gently wind and weave them around or through arbors and trellises, or poles or tree branches, or whatever. Using a sharpened toothpick and small tweezers, carefully bend and twist the leaves slightly to give depth and form to the runners. As you do this, you will see the leaves at different angles as well as the backs of some (which are a lighter shade of green). This variation gives the plant life an incredibly realistic appearance.
Don't forget to closely inspect for any nicks or scrapes that may let the shiny brass show through. Touch-up with a small brush as required.
If you need to anchor these runners in place, you can use a tiny dab of gap-filling CA adhesive. If after the adhesive dries there is a shiny spot, add a small dab of Model Masters Flat Acrylic Clear paint, and the shine will totally disappear.