|


Best viewed using:
Internet Explorer
or
Mozilla Firefox

 |
Foliage How to...continued
If autumn colors are desired, such as
the yellows, ochres, oranges and various shades of red seen with the Sycamore,
Maple, Sweetgum (Liquid Amber), etc., an easy way to accomplish this is as
follows:
-
Color spray an entire fret with the
lightest autumn color (a golden-yellow, perhaps).
-
Very lightly spot-spray
(or dry brush) various areas with a darker shade/color (maybe a shade of
orange).
-
Repeat step 2, gradually moving
toward the darkest leaf color you plan to use. Remember, the variations in color
should be subtle and restrained like they are with the Sycamore leaf in Figure
4, not too vivid. The intent is to make the tree an eye catcher, not an assault.
In this way, you will produce a fret
that has varying shades and color distributed randomly over the fret. When the
individual branches are removed and placed on the tree armature, then
"distorted" to look natural, the gentle intermixing of colors as well as
highlights and shadows will create a dramatic appearance that is not achievable
using ground foam foliage, and the spaces between the etched leaves and branches
produce an appearance of realism not that is unparalleled.
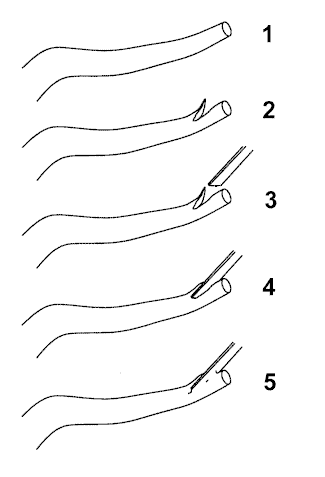
Attachment of the the painted branches to a tree armature (such as our NS041
Bare Tree Frame) is quite straightforward. Start with the lower branches and
work up the tree. Be sure to turn the tree frequently and look at the overall
appearance (balance) when selecting etched branch placement. We suggest using
CA adhesive to "mount" the painted branch to the armature branch. CA will
allow you to make a quick placement because the bond time is very short. If
you any difficulty in getting a good quick bond to the painted branch base,
simply scrape a tiny area clean with a scalpel before applying the CA. Once
the CA is totally dry, the joint can be covered with white glue or a small dab
of caulk to give the appearance that one branch is flowing from the other. For
added realism you can then use a small brush and touch-up the joint and a
portion of the etched branch with the paint chosen for the tree bark color.
Figure 5 shows the basic steps for attachment.
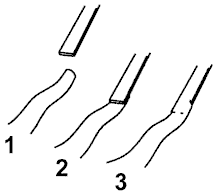
For tree frames that are plastic, or fabricated from wood cuttings (Azalea
branch clippings, for example), an optional method of attachment can include
the addition of a notch at the end of the armature branch to help secure the
etched branch end. This is not an essential step but can help if you're having
any difficulty in attachment. See Figure 6 for the example. This is also an
easy way to add several branches along a larger branch. Once again, use CA for
the initial bond, then you can follow-up with white glue or caulk for
blending. Finish with a light brush touch-up of the bark color.

Figure 6
The final step in making a tree using etched foliage is the Individual shaping
(distortion) of the etched leaves and branch ends. This should be done
progressively as you are adding the etched branches. Do some initial shaping
to give the tree a pleasing form and realistic shape , the go back and "fine
tune" with further tweaking until you're satisfied with the overall
appearance. A little trick that will help you minimize scratches and nicks
that your tweezers could make on the painted leaves and branch ends is to coat
your tweezer tips with paint first. Just dip your tweezers in the paint color
of the pre-painted parts and let it thoroughly dry. When you use them
to handle or bend the parts, the paint will help hold and cushion the part. It
won't totally eliminate the possibility of nicks and scratches, but it will
help. When you're done, just soak the tips in solvent or gently scrape the
paint off.

After all painting has completely dried, removal of the individual branches
from the fret should be performed in the same manner as with the Pond and
Marshland Plants. Cut the smallest (most fragile) attachment points from the
fret first, gradually working toward the largest (branch bases), last. Paint
touch-up of scrapes or dings (or missed painting) can be done with a small
brush during an overall inspection of the tree after the branches have been
attached and shaped for a natural appearance.
Figure 5
|


