


Best viewed using:
Internet Explorer
or
Mozilla Firefox


LED Circuits
Our goal here is to provide an overview of the basic types of circuits used to power LEDs. The circuit diagrams, or schematics, that follow are drawn using industry standard electronic symbols for each component. Symbol definitions are as follows:
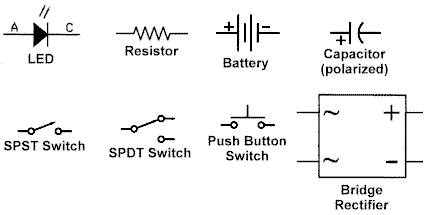
The LED symbol is the standard symbol for a diode with the addition of two small arrows denoting emission (of light). Hence the name, light emitting diode (LED). The "A" indicates the anode, or plus (+) connection, and the "C" the cathode, or minus (-) connection. We've said it before, but it bears repeating: LEDs are strictly DC devices and will not function using AC (alternating current). When powering an LED, unless the voltage source exactly matches the LED device voltage, a "limiting" resistor must be used in series with the LED. Without this limiting resistor, the LED would instantly burn out.
In our circuits below, we use the battery symbol to indicate a power source. Power could just a easily be provided by a power supply, or wheel pickups from track on a layout. Whatever the source, the important thing is it must be DC and well regulated to prevent over-voltage fluctuations causing damage to the LEDs. If the voltage source is to be supplied from track pickups, a bridge rectifier should be used to ensure LEDs only receive DC and unchanging polarity.
The switch symbols are fairly straightforward. A single-pole, single-throw (SPST) switch is simply an on-off function, while the SPDT (double-throw) switch allows for routing between two different circuits. It can be used as a single-throw switch if one side is not connected to anything. The push-button is a momentary contact switch.
The capacitor symbol we're using here is for the electrolytic or polarized type of capacitor. That is, it must be used in a DC circuit and connected properly (plus connection to the plus voltage), or it will be damaged. For our purposes, it is used for momentary storage, to help "smooth out" fluctuations in supply voltage caused by small losses as wheels picking up power roll across dirty spots in the track or gaps at turnouts. Polarized capacitors are graded by different maximum DC voltage ratings. Always use a capacitor who's rating safely exceeds the maximum voltage expected in your application.
The Basic Circuit
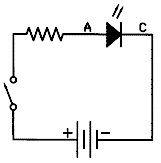
This is as simple as it gets. The single LED circuit is the building block on which all of our other examples are based. For proper function three component values must be known. The supply voltage (Vs), the LED device operating voltage (Vd), and the LED operating current (I). With these known, using a variation of Ohm's Law, the correct limiting resistor (R) can be determined. The formula is:
![]()
An example working through this formula can be found on our Bridge wiring tips page. Review step 7 for details.
In the schematic above, we have both the limiting resistor and the switch connected on the positive (+) side of the circuit. We've done this to be consistent with "standard electrical practices" in working with the "hot" (plus) side of the circuit rather than the minus (-), or "ground" side. The circuit would actually function adequately either way, but standard safety practices recommend the "disconnect" on the "hot" side to minimize to possibility of electrical shorting of wires to other "grounded" circuitry.
Circuits with two or more LEDs
Circuits with multiple LEDs fall into two general categories; parallel-wired circuits, and series-wired circuits. A third type known as a series/parallel circuit is a combination of the first two and can also be quite useful in modeling projects.
The general rules for parallel and series LED circuits can be stated as follows:
-
In a parallel circuit, the voltage is the same through all components (LEDs), but the current is divided through each.
-
In a series circuit, the current is the same, but the voltage is divided.
-
In a series circuit, the sum of all LED voltages should not exceed 90% of the supply voltage to ensure stable LED light output.
-
In a series circuit, all LEDs should have the same voltage (Vd) and current (I) properties.
The parallel wired LED circuit
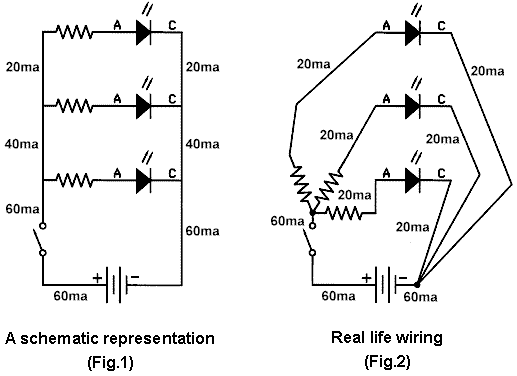
Shown above are two examples of the same circuit. Figure 1 on the left, is a schematic representation of three LEDs connected in parallel to a battery with a switch to turn them on or off. You'll note that in this circuit, each LED has its own limiting resistor and the supply voltage side of these resistors are connected together and routed to the plus battery terminal (through a switch). Also note that the cathodes of the three LEDs are connected together and routed to the negative battery terminal. This "parallel" connecting of components is what defines the circuit.
If we were to build the circuit exactly as shown in Figure 1, with wires connecting the devices the way the schematic shows (jumper wires between the resistors, and jumper wires between the cathode connections), we would need to consider the current carrying capability of the wire we choose. If the wire is too small, overheating (or even melting) could occur.
In many instances throughout this website we show examples of LEDs wired using our #38 coated magnet wire. We chose this size wire for very specific reasons. It is small enough (,0045" diameter including insulation coating) to appear prototypical as wire or cable in most projects, even in Z-Scale, and it's large enough to supply current to 20ma lighting devices (like our LEDs) with an extra 50% safety factor. As specified, #38 solid copper wire has a nominal rating of 31.4ma and a maximum rating of 35.9ma. We could have selected #39 wire, with a nominal current value of 24.9ma, but we felt this wouldn't safely allow for fluctuations in resistor values or individual LED variations. Plus, the slightly smaller diameter (.004" instead of .0045") probably wouldn't make a noticeable difference in modeling.
Getting back to Figure 1; you can see in this example the current requirement for each LED/resistor pair, adds to the next, and follows the parallel circuit rule (#1) above. We couldn't safely use our #38 magnet wire for this entire circuit. For example, the jumper from the bottom LED cathode to the negative battery terminal will be carrying 60ma. Our wire would quickly overheat and possibly melt causing an open circuit. For this reason, Figure 1 is only an easy way to "schematically" represent how components should be connected for proper circuit function.
In real life, our actual wiring project would look more like Figure 2. In this case, we can safely use our #38 wire for everything except the connection between the plus battery terminal and the switch. Here, we would need at least #34 wire (79.5ma nom.), but we'd probably use something like Radio Shack's #30 insulated wrapping wire. It's inexpensive, readily available, and will carry 200ma (nominal spec.). Plenty large enough for our application. Also, we probably wouldn't actually solder the three resistors together at one end as we've shown, we'd just use another piece of that #30 to connect their common ends together and to the switch.
Model railroad layouts can become electrically complex involving all sorts of wiring requirements for things like track power, switching, lighting, signaling, DCC, etc.; each with different potential current needs. To assist in your planning for such things, a table of common wire (solid copper single-strand) sizes and their current carrying capabilities is available here.
The series wired LED circuit
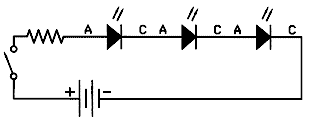
This circuit is a simple series circuit to power three LEDs. You'll note two main differences between this and the parallel circuit. All of the LEDs share a single limiting resistor, and the LEDs are connected anode-to-cathode in "daisy-chained" fashion. Following rule #2 above, the formula we'll use to determine our limiting resistor is a further variation of the formula we used above. The series formula for the above circuit would be written as follows:
![]()
The only real difference here, is that our first step is to add the device voltages for the number of LEDs we're using together, then subtract that value from our supply voltage. That result is then divided by the current of our devices (typically 20ma or .020). Simple, yes? Remember to also consider rule #3. That is, multiply your supply voltage by 90% (0.9), and make sure that the sum of all device (LED) voltages doesn't exceed that value. That's all there is to it, almost...
We need to know what kind of wire we're going to use, so what kind of current draw can we expect from this kind of circuit? Well, in the parallel circuit above, for three LEDs at 20ma each, we would be consuming 60ma at the battery. So... 60ma? Nope. Actually, slightly less than 20ma for all three LEDs! We'll call it 20 for simplicity sake.
Another way of stating rules 1 and 2 above would be:
-
In a parallel circuit, the device voltage is constant, but the current required for each device is added together for total current.
-
In a series circuit the device current is constant, but the voltage required is the sum of all device voltages (added together).
Let's work through some examples using a 9 volt battery (or power supply):
Example #1
We want to hookup two of our 2x3 Super-white LEDs in series.
-
First, we determine the device voltage, which is 3.6 volts and add it together for two LEDs (3.6 + 3.6 = 7.2).
-
Now that we have this amount, let's make sure it doesn't violate rule #3. 80% of 9 volts is 7.2 volts (.8 x 9 = 7.2). The amounts are equal. We aren't over 90%, so we can proceed.
-
Next, we subtract this 7.2 amount from our supply voltage (9 volts) and get the result which is 1.8 (this is the Vs-Vd part).
-
Then, we divide 1.8 by our device current which is 20ma, or .02. Our answer is 90. Since a 90 ohm resistor isn't standard, we'll pick the next highest value (100 ohms). This slightly higher resistance won't make any difference in the brightness of the LEDs.
-
Finally, since our current draw is only 20ma total, we could use our #38 wire for everything, if we wanted to.
Example #2
We want to connect four of our Micro red LEDs in series. What resistor should we use?
-
We find the device voltage to be 1.7 volts. For four LEDs it would be 6.8 volts (4 x 1.7 = 6.8).
-
Now that we have this amount, let's make sure it doesn't violate rule #3. 90% of 9 volts is 7.2 volts (.8 x 9 = 7.2). And, 6.8 is less than 7.2. Yep, we're OK.
-
Next, we subtract this 6.8 amount from our supply voltage (9 volts) and get the result which is 2.2 (this is the Vs-Vd part).
-
Finally, we divide 2.2 by our device current which is 20ma, or .02. Our answer is 110. As it turns out, 110 ohms is a standard resistor value, so we don't have to pick the closest higher value available (never choose a lower value!). We'll use a 110 Ohm 1/8 watt 1% resistor.
Example #3
We want to connect three of our Micro Super-white LEDs together in series.
-
The device voltage is 3.5 volts. So for three LEDs it will be 10.5 volts, and... we have a problem. This amount not only violates rule #3 above, it exceeds our supply voltage. In this case, our LEDs won't even light up. In this situation, if we need three of these LEDs, we'll either need a power source that supplies at least 11.67 volts (that's what 10.5 would be 90% of), or we'll have to connect only two in series and the third one separately, with its own resistor (a series/parallel circuit, but more on that shortly). In this case, we will have two circuit types connected together at a common power source. The schematic would appear as follows:
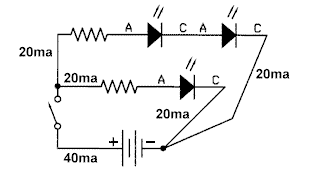
Here again, we can use our #38 wire for everything except the connection between the power source and the switch. To determine what limiting resistors are required here, we just calculate each segment of the circuit separately. It doesn't matter which segment is determined first, but we'll do the single LED/resistor. For this we use our original formula:
![]()
We know that Vs (for these examples) is 9 volts. And. we know Vd is 3.5 volts and I is 20ma. So, (9 - 3.5) = 5.5 ÷ .020 = 275. That's not a standard value resistor, so we'll use a 300 ohm resistor here.
Now, we'll calculate the series pair of LEDs. The formula for just two LEDs would be:
![]()
Again, Vs is 9 volts, so 9 - (3.5 + 3.5) = 2 ÷ .020 = 100, and that's a standard resistor value. We're done. We can now wire up this example and everything will work properly.
Lighted Kato Amtrak Superliner with EOT lights
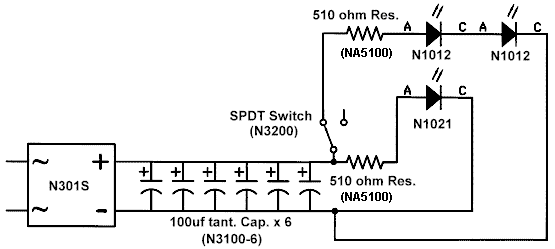
Here's the schematic of a passenger car wired for lighting using a bridge rectifier and 600μf of capacitance to ensure flicker-free polarity-stable DC is supplied to all LEDs. A super-white LED lights the car interior and two Micro red LEDs provide End-of-Train lights. A switch is added so the EOT function can be turned-off, if desired. A running example of this car (with 800μf of flicker control) can be seen here.
The series/parallel wired LED circuit
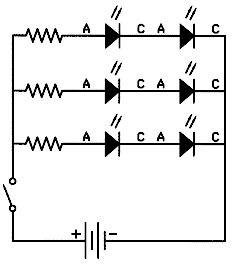
Here, we've expanded a little on our example #3 above. We have three groups of series-pairs of LEDs. Each is treated as a separate circuit for calculation purposes, but are connected together for a common power source. If these were to all be our Micro Super-white LEDs, we already know everything necessary to build this circuit. Furthermore, we know that each series-pair will draw 20ma of current, so the total at the power source will be 60ma. Pretty simple.
The interesting thing about series/parallel LED circuits is how easily you can expand the number of lights on a given power source. Take our N3500 Switching Power Supply for example. It provides 1 Amp (1000ma) of current at 9 volts.
Using our parallel circuit earlier on, we could connect up 50 of our 2x3, or Micro, or Nano Super-white LEDs (or any combination equaling 50), each with their own limiting resistor, and this little supply would handle it. That would probably be sufficient for a decent sized town. Now, if we're a little cleverer, we could use some series/parallel circuits and easily expand this quantity, still with just one supply. If they were all series/parallel, we could run 100 lights. Hypothetically, if we were doing a project using our N1012 Micro red LEDs (1.7 volt device voltage), we could run 400 LEDs with our little supply. That's a pretty bizarre thought, however. Dark glasses anyone?
For further details on using our Switching Power Supply for your layout or diorama projects, click here.
Don't forget rule #4. As you create series groups, make sure the device voltages and current requirements are closely similar. Suffice it to say that the mixing of LEDs with large device voltage differences or current requirements in the same series group will not produce satisfying results.
Finally, be imaginative. You can mix-and-match. Series circuits, parallel, single-wired LEDs, series/parallel circuits, white groups, red groups, yellow, green, whatever. As long as you calculate each case for proper limiting resistance and watch your wiring schemes for correct wire size, your lighting projects will work with very satisfying results.
One other thing, for those of you that feel uncomfortable working "long-hand" with the above formulas, we've created several calculators to do the computations for you. All you have to do is enter the values and click the "calculate" button. They can be found by clicking here.
... LET THERE BE LIGHT ...
© 2008 Ngineering