


Best viewed using:
Internet Explorer
or
Mozilla Firefox


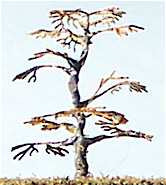
- Now that we've got the basic shape of the tree formed, we'll start gently "tweaking" each limb, branch and twig to give it a more natural appearance. Some may have a slight downward droop, others may be straight or curved upward. The objective here is to create a random and eye-pleasing balance that gives the overall shape some "character". Take a look at Figure 7 and you'll see what we mean. For the moment, ignore that the trunk and main branches already have caulking applied, that will be covered soon. At this time, study the subtle variations in curvature of the various branches and you'll see the appearance of "character" we're talking about. This is very important. The variety of tree you plan to build, and where it's going to be located will have a huge impact on the "believability" of the finished tree. For example, if you're in need of say, several Monterey Pines along the edge of a Pacific cliff, the "tweaking" should be create the appearance of wind-swept, slightly twisted and bent trees. On the other hand, if this will be an orchard tree, you may even want to clip off one or two of the top-most branches, or bend them lower, since most orchard trees are shorter and wider (pruned that way for easier picking). On the other hand, a curbside tree may be pruned for symmetry and some of the lower branches removed for clearance. The point is, if we want to do our best to model realism in detail, these things should be considered. Be sure to view the tree from all angles to make sure there is no branch laying perfectly flat.
Making trees...continued
Figure 7

- Before we get too far along, we should make some tree holding aids. Select a few of the bamboo skewers and, using your hobby saw (or any fine-toothed saw), cut them into 2-3 inch lengths. Discard the pointed parts as we won't be using those. You may want to lightly sand the ends so they're fairly square and even. Now, using your scalpel, cut a slit in one end of each section (see Figure 8). Be very careful not to cut yourself in the process. You may want to use a small vise to hold the sections while you doing this.
- Now it's time to apply the caulking to the tree trunk and main branches. If you're going to use one of the MonoJect curved-tipped plastic syringes (or any similar syringe), pull out the plunger and squirt a small amount of caulk into the syringe. Do not put in too much, and place it against one side of the inside of the syringe (see Figure 11). This is so when you reinsert the plunger the air can escape through the tip and won't get trapped inside. This is very important. The caulk dries because of contact with air. If you ensure all of the air has escaped as you depress the plunger and work the caulk out to the tip of the syringe, the caulk will stay fresh and usable in the syringe for months. You will need to either slide a curved pin in the tip of the syringe, or cap the tip. Otherwise, the caulk will harden at the tip. You will also want to cap or plug the tip of the big tube of caulk that you used to fill the syringe. That way, you'll have an endless supply.
Figure 8
- Next select a wooden block and drill a line of holes along the center spaced at about 2" intervals (see Figure 9). Drill the holes deep enough into the block to ensure the skewers will stay put. Select a drill diameter that will let the skewers stand straight in the block but not a tight fit. This will be the stand for the skewer sections we'll use to hold the trees while caulk, paint, hairspray, and dulling spray dries at various steps in the tree making process. If you plan to make a lot of trees, you may want to drill several blocks.
Figure 10
Figure 11
- Now select one of the trees you've shaped as covered in step 5 and insert the "V" shaped bottom of the trunk into one of the slitted skewers (see Figure 10). You will want to hold the base of the trunk with pliers while it's inserted into the skewer. Make sure the tree is positioned so it sticks straight up out of the skewer. We recommend leaving the trees permanently attached to these skewers so when the time comes for placement of the tree, simply cut off most of the skewer and leave a "stump" protruding down. Then when you're ready to place the tree, just drill a hole the diameter of the skewer in you layout or diorama and insert the tree. Glue it in place and add a little ground cover or earth to hide the stump and you're done. If you're going to leave the trees attached to the skewers as we suggest, add a drop of CA to the joint to make sure the tree stays put.
Figure 9
© 2008 Ngineering