


Best viewed using:
Internet Explorer
or
Mozilla Firefox


Using our Magnet Wire
The magnet wire we supply is manufactured by Superior Essex, Inc. and has a single-build (single layer coating) of Superior's Soderon® heat removable insulation. This is vastly superior (no pun) to chemical removable insulations or the kind that require scraping. While Superior has many different types of heat removable insulations, we chose Soderon 155 for its low-temperature removal characteristics compared to their other insulations. Following is a quote from their Engineering Dept:
"The minimum requirements for our Soderon/155 are specified by the NEMA Standard. NEMA MW-80C requires sizes 30-36 awg to solder a maximum of 4 seconds at 390 deg. C. The requirement for 37-44 is 3 seconds maximum at 390 deg. C. Our Soderon/155 product typically will solder at least 1 second faster than what NEMA requires."
What this means for our #38 wire is that without pre-tinning, the wire can be soldered to a typical solder pad by simply applying an iron (with solder and flux) that is at least 390 deg. C (734 deg. F) for about 2 seconds and the insulation will burn back and the solder joint will be made. What could be simpler.
However...
If we did that to the solder pads on our LEDs, they'd be cooked!
The maximum temperature/duration guidelines for soldering our LEDs varies slightly between our 2x3 LEDs, our Micro and Nano LEDs, and our Subminiature LEDs, but is essentially 260 deg. C (500 deg. F) for 2-3 seconds maximum. For this reason, the soldering procedure we recommend is to pre-tin (thereby stripping) the wire. This does three things:
-
We control the quality and amount of insulation removal without worrying about damaging a component with excessive heat.
-
We are tinning the bare copper wire in preparation for step 3 and this pre-tinning ensures the attachment of the wire to the heat-sensitive LEDs will be as easy and as quick, as is possible. Practice makes this process easy and allows for a clean, low-profile solder joint which is very desirable when trying to get our Micro and Nano LEDs to "snuggle up" close to objects (like lampshades for instance).
-
By having the wire pre-tinned with solder, and having solder pads on the LEDs that are either gold plated or pre-tinned themselves, the wires nearly instantaneously bond to the LEDs when touching the wire/solder pad junction with the iron. In nearly all cases a clean iron with a very slight amount of fresh solder on the tip will make this "perfect" low-profile wet looking solder joint. Hardly any cleanup will be necessary (possibly none). You may find it helpful to add a tiny (very, very tiny) amount of liquid soldering flux to the solder pad prior to this "touching" operation with the iron. This will guarantee the instantaneous flow of solder and a wet shiny joint. there are many brands of liquid soldering flux on the market. One that we've found to work very well is made by GC Electronics (their part #10-200). If used very sparingly, there should be minimum to no residue for cleanup. If flux remains after soldering, blot away any excess and cleanup with a Q-tip lightly saturated with isopropyl alcohol. However, do not saturate the LEDs with liquid. You may find there is sufficient flux in your wire solder that you don't need the additional fluxing agent. If so, that makes cleanup a little easier. A little practice of the above and this becomes a very easy and repeatable process.
We recommend using our 12 watt miniature soldering iron for soldering wires to our LEDs because it is closer in temperature to the guidelines of our LEDs than most small irons (it reaches 600- 650 deg. F when up to temp.) and its ultra-small size, flexible cord and short "fingers-to-tip" distance gives the best control. When you're working with tiny components like our LEDs or N-Scale locomotive decoder wiring in tight places, these features make the difference. Having said that...
To properly tin the magnet wire a larger, hotter iron is necessary. The Soderon® insulation breaks down at 400 deg. C (752 deg. F). We recommend a 30-40 watt iron which will give about 750-850 deg. F. Radio Shack as well as most hardware stores carry such irons and they're relatively inexpensive ($10-$20). Check the iron package, it should say what the tip temperature range will be. Most hobbyists probably already have one. Using this hotter iron will ensure a brightly tinned wire with uniform burn-back of the insulation. Too cold of an iron requires a longer period of wire -to-solder contact. This discolors the insulation further up the wire and makes a ragged tinning job with poor definition between clean insulation and shiny tinned wire. With very little practice, it becomes a quick, simple, one-step motion to tin & strip our magnet wire.
To master the stripping and tinning of our wire is quite simple, but like most things, requires a bit of practice. We recommend cutting 5 to10, 6" pieces of both the red and the green wire to use as "practice wires". This wire is very inexpensive (200 feet on our spool for just under $5), so sacrificing a few feet is just a few pennies. The important part of this process is to develop a "tempo" that works well for you, with your iron. That builds confidence.
Once this is achieved, making good looking tinned and stripped wire segments becomes easy and very repeatable. This is especially important when soldering wires to our tiny Nano LEDs. The transition from the stripped and tinned portion of the wire to the point where the insulation is unstripped must be a nice clean and sharp transition, not ragged. This is because our tiny Nano LEDs have solder pads that are quite small and close together. We need to make sure the wires that exit from the solder pads are insulated so they don't short against each other.
Our "preferred method" for pretinning wire is to clamp our iron in a bench vise so it is held in place about 4-6" above the workbench surface and about 6" in from the from edge of the bench. This positioning gives us good comfort and hand control because we can rest our hands on the workbench for good steady support. We also want s damp sponge nearby so we can wipe the tip clean and apply fresh solder as required.
With the iron hot and the tip clean, apply solder to the tip to form a "bubble" (our N4200 solder works very well for this operation also). Depending on the type of soldering tip on your iron (flat, spade, or pointed), this bubble of solder may either be setting up on the top of the tip, or hanging down on the underside of the tip. Figure 1 below shows how a solder bubble could look on your iron tip.
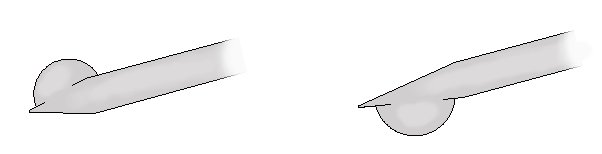
Figure 1
CAUTION: We recommend placing your dampened sponge on the workbench directly under the tip of your iron. If the molten solder from your iron should drip and splatter on your workbench surface, you can be severely burned and your clothing can be damaged. The damp sponge will catch any solder drip and the moisture in the sponge will instantly cool and solidify the solder.
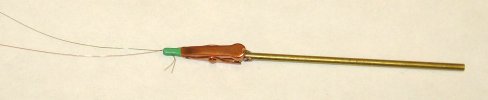
Pick up a piece of the cut wire and poke the end of the wire into the solder bubble and immediately pull it out. If the iron is hot enough to burn away the insulation on the wire, the piece you just pulled out of the bubble should look like Figure 2 below.
Figure 2
If the iron is too hot or if you left the wire inside the solder bubble too long, the insulation can get bubbly and ragged looking . Too much time in the bubble can also excessively discolor and burn the insulation. See Figure 3 below for what you don't want to see.
Figure 3
This is the whole reason for "practice wires". To learn what works best with your iron and solder. It may take several attempts before you get the "rhythm" and resulting consistency, but it's easy once you've tried it a few times.
What we're looking for here is a definite "line" or transition where the tinned wire becomes the insulated wire. This ensures us that when we position the tinned portion over a solder pad and solder it in place, insulated wire is leaving the other side of the pad. That way there will never be a chance of shorting to an adjacent pad or wire. When you dealing with these small components and wire, good clean soldering jobs ensure reliable connections that will work after everything's assembled and not fail later.. Enough said. Try it, it's easy and you'll like the results.
It doesn't matter how long the tinned portion is (1/8" to 1/2" is fine), because you'll trim it to the length you need at hookup time. This part is covered in the LED wiring process.
Repeat the process for the other end of the wire. It is always good to tin both end of every wire so that as you wire up LEDs, they can be easily tested. The wire end may need to get trimmed when running wire through tubing or a small hole, but it is easy enough to re-tin the end before retesting an assembled light or connecting the wire to a power source.
As you progress in pretinning wires you may find that it is very helpful to tin up a bunch of them ahead of time so when you're building various projects you don't have to stop and pre-tin wire. We keep a small section of masking tape stuck next to the workbench and tin up 10-20 or each color at a time so they're always available.
As you strip and tin the wire, you will find that the solder bubble get quickly contaminated with the wire insulation residue. It will appear somewhat rough rather than smooth and dull in color rather than shiny silver. Take your damp sponge and wipe the iron tip clean and apply a fresh solder bubble. This may be necessary every 2-6 wire tinnings, depending on how much (in length) the wire is tinned.
Unless you're going to be running four #38 wires inside the .018" tubing, or "hiding" the wiring in cracks and grooves in structures to make the disappear, we think you find that twisting the wire pairs makes them much easier to handle. Also, if your doing external "old-fashioned" wiring, pole-to-structure wiring or hanging lamp wiring, the twisted (then painted) wires look great.
Here's a simple method to get uniform twists in virtually any length of wire pairs (or more than two), without kinks or breakage by using our NT306 Twisting Tools.
Cut the magnet wires you're going to twist to approximate length leaving them a little longer (twisting shortens the overall length slightly). Place the ends of a pair of wires side-by-side (not overlapping) in the jaws of one clip with 1/2" to 1" protruding out the back of the clip. Clamp that clip in your bench vise so the wires are pointing toward you.
Carefully place the other wire ends in the second clip's jaws. Pull the second clip toward you until there's just a slight tension on the wires, just enough to keep them straight. Start spinning the clip with the rod in your fingers while keeping slight tension on the wires and you'll see the twists forming evenly along the full length of the wires. Don't over-twist them, but sufficiently to get the appearance you're after.

f you're planning to pre-paint the wires prior to tinning/stripping the ends and soldering them, just place the clip you had in your fingers in another vise or holding fixture and dip a brush in the color you want (we recommend acrylic paint here) and slide the brush up and down the wire to give it an even coat. Let it dry and remove the finished product. Nothing to it!
General handling of magnet wire
The insulation on our magnet wire is quite durable considering its thickness is only about .0003" on average. It will standup nicely to most normal handling so you can work with it with confidence. If you feel you may have nicked a section or kinked it unnecessarily, cut that portion off and throw it away (or use it for N-Scale 3/4" cabling somewhere). It's not worth the risk of an electrical short or broken connection to try to fix the possible damage. Keep the wire clean and make sure your hand a oil-free when handling it so that if you wish to paint the wire you'll get good, even adherence. That's about it.
© 2008 Ngineering