


Best viewed using:
Internet Explorer
or
Mozilla Firefox


Using the HO Gooseneck tubing Bending Tool
-
Simplifies forming of .018" stainless steel thin-wall tubing used in fabrication of HO Gooseneck style building lights.
-
Ensures uniform consistency when making multiple gooseneck lights
-
Durable all-metal construction for long life

This tool is designed to allow step-by-step forming of of the tubing shown in the picture of the building light above. We also have a kit (NK015) which includes enough parts to build 8 of these lights. More information about the kit can be found here.
The first step in building this gooseneck light is to flare the end of a segment of the .018” tubing. The complete procedure for doing this can be found here (under cold flaring).
Once the tubing has been flared, the next step is forming the gooseneck shape and that is where this tool is used. Following is the step-by-step procedure:
Bending the tubing
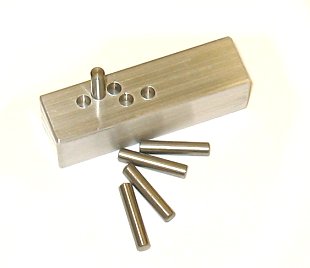
The tool (pictured below) consists of an aluminum block which contains 5 holes, and 5 .125" diameter pins which fit into the holes. The holes are located in a pattern that with pins inserted, provide a bending pattern that the .018" tubing can be formed around to achieve the gooseneck shape.
The diagram below shows the tubing in position in the tool.
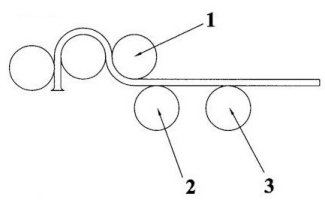
Note that the flared end of the tubing is aligned with the bottom edge of the first pin. A line could be scratched in the fixture surface to assist in alignment as well. Note that we’ve labeled 3 of the pins around which the tubing is to be bent, 1, 2, and 3. The bending procedure is as follows:
-
Clamp the bending fixture in a bench mounted vise or some holding fixture to ensure it will remain stationary during the tubing bending process.
Place a segment of flared tube with the .012" stainless steel wire inserted approx. 1” into the flared end of the tube, into the fixture so the flare is positioned as shown in the picture (aligned with the bottom edge of the first pin).
Holding the tubing down against the fixture surface, gently wrap the
tube around the second pin 180 degrees in the clockwise direction to
form a half-circle as shown. Bend slightly past 180 degrees so the tube
will just clear the insertion of pin, marked 1 in the
drawing when the tube is in a relaxed state.
Insert pin
1 and carefully wrap the tube
counter-clockwise 90 degrees so it will just clear the insertion of pin
2 and 3.
Insert pins
2 & 3.
While holding the bent tubing down firmly into the fixture with one
hand, grasp the .012" wire that protrudes from the flared end of the
tube with a pair of pliers and pull the wire out of the tube. Pull in a
continuous (non-jerking) motion and pull the wire in a straight
direction. This will prevent distortion of the bent tubing.
Remove the formed tube from the fixture and cut and deburr the end to
the desired length.
Important note: The .012" wire can be lightly coated with thin oil prior to inserting it into the tube. This will facilitate easier removal from the formed tubing, HOWEVER... the remaining oily film inside the tubing will make pushing the magnet wire through the bent tube very difficult. If oil is used, squirt some type of cleaning solvent through the tube and thoroughly dry it before proceeding.
In all cases, the way we've found easiest and quickest to cut tubing to length is to simply snip it slightly oversize in length (using ordinary side cutters) and then, using a Dremel and sanding disk sand off the crimped ends until the tube is round and to the length you need. The .018” tube inside diameter can easily be deburred using a #80 drill bit in a pin vise. The external diameter is deburred using an Arkansas stone or fine sand paper.
This completes the use of the HO gooseneck tubing bending tool.
© 2011 Ngineering